This chapter contains the following topics:
Introduction to Recurring Bills
Printing a Recurring Bills Edit List
Selecting Recurring Bills for Use
Using Selected Recurring Bills
A recurring bill is an invoice which is billed periodically for a sale made at regular intervals to the same customer. For example, if a pest control service sprayed a building every month, an invoice for the service would be printed each month.
The Recurring Bills selection lets you enter recurring bills and select the bills that you want to use as invoices during each billing cycle. The recurring bills remain for use in later billing cycles.
Recurring bills are very similar to Invoices, so much so that this chapter will sometimes describe only the differences between them in order to avoid much repetition. Recurring bills is different than Recurring sales. For example, recurring sales does not allow the entry of line items. To read about the other differences see the Recurring Sales chapter.
If you want to only view the entered recurring bills, see the View Recurring Bills section the of the View chapter.
Here are some of the features of Recurring bills:
| • | Recurring bills need no posting. No accounting transactions are created when a recurring bill is entered, only after it is turned into an invoice. From the Invoices menu selections it is printed and posted. |
| • | Credit checking happens each time a recurring bill is selected for use as an invoice, but not when it is initially entered. |
| • | The Bill type of all recurring bills is Invoice. There is no such thing as a recurring credit memo. |
| • | Recurring bills allow the entry of recurrence information in addition to entering the header, line-item, and totals, each on a separate screen. |
| • | If you have permission to the Customers menu selection, recurring bills does allow on-the-fly entry of customers accessed through the lookup. However a user may enter ship-to addresses on-the-fly regardless of menu permission. |
| • | Recurring bills can be assigned to jobs, but unlike invoices the same bill cannot be split among multiple jobs. |
| • | If you are interfaced to Inventory Control, you may enter items from I/C on the lines. See Inventory Control. Recurring bills cannot interface to Inventory Management items. |
| • | You may also enter notes and services on the lines. |
| • | If you are using Goods from Goods and services, you may enter goods on-the-fly. |
Recurring bills may be under batch control, which involves screens not discussed in this chapter. Refer to the Using Batch Controls chapter of the System User documentation. Only the Select for use and Use selected options use batch controls (Enter and Edit list do not).
Select
Enter from the Recurring bills menu.
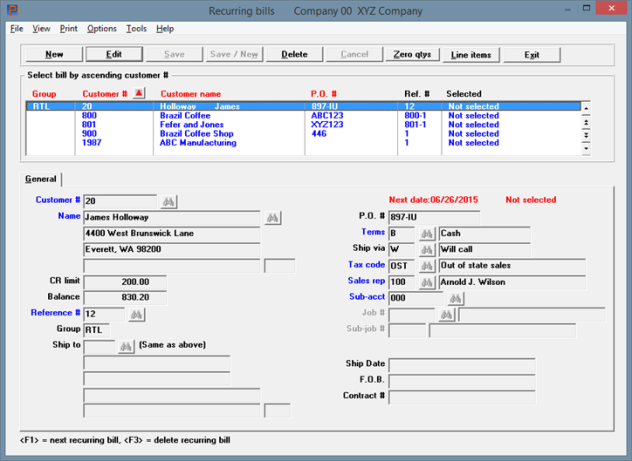
This is the header screen:
Graphical Mode

The list box displays up to 6 existing recurring bills at a time. You may sort the recurring bills by group, customer number and customer name in ascending or descending order. Only column names in red may be sorted. To select or change the sort order, click on the column name or the arrow to the right of the column name or use the View options.
To locate a recurring bill, start typing a group number, or a customer number or name that matches the selected sort order. You may also use the up/down arrows, Page up, Page down, Home and End keys to locate a recurring bill. The <F1> and <SF1> keys function the same as the up/down arrow keys.
Recurring bills that display in the list box are available for changes or deletion. The header fields for the selected recurring bill display in the lower part of the screen. The lines are accessed via the Line items button.
When a recurring bill is found, you may select the <Enter> key or Edit button to start editing.
You have the following options with the buttons and keyboard equivalents:
| Button | Keyboard | Description |
|---|---|---|
|
New |
Alt+n |
For entering a new recurring bill header |
|
Edit |
Alt+e |
For editing an existing recurring bill header |
|
Save |
Alt+s |
For saving the addition of the new recurring bill header or for saving the changes to an existing recurring bill header |
|
Save/New |
Alt+w |
This is a combination of the Save and New buttons |
|
Delete |
Alt+d |
To delete a recurring bill |
|
Cancel |
Alt+c |
To cancel adding or editing a recurring bill. Your entries will not be saved |
|
Zero qtys |
Alt+z |
To zero the quantities for all line items and most services for the selected recurring bill. This will not affect flat rate services with no unit of measure. Except for non unit of measure items, when zeroing line quantitys the total qty and Invoice (total) fields on the Line item screen are also zerod. Also, if Selected the status is changed to Not selected. |
|
Line items |
Alt+l |
To access the line items of an existing recurring bill for entering, editing or deleting them |
|
Exit |
Alt+x |
To exit the recurring bill header window |
Menu Selections
For general users, the options menu selections can and may be restricted by the assigned menu. The Options menu selections include:
| Menu selection | Link to documentation |
|---|---|
|
View invoices |
|
|
View invoice history |
|
|
View customers open items |
|
|
View recurring bills |
|
|
View customer history by date |
|
|
View customer history by doc # |
For general users, the print menu selections can be restricted based on the assigned menu. Under the print menu selections you may access the following:
| Menu selection | Link to documentation |
|---|---|
| Edit list | Printing a Recurring Bills Edit List |
The header screen has one General tab.
Character Mode
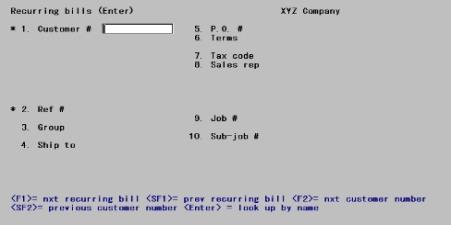
From this screen, you can work with both new and existing recurring bills. If a recurring bill has already been entered for the customer number and reference number you specify, it will appear and be available for changes or deletion.
This screen closely resembles the corresponding screen in Invoices. See the Invoices chapter.
Enter the following information:
Options
Enter the customer number for the recurring bill, or use one of the options:
|
<F1> |
For the next recurring bill |
|
<SF1> |
For the previous recurring bill |
|
<F2> |
For the next customer in customer number sequence |
|
<SF2> |
For the previous customer |
|
Blank |
To look up the customer by name |
You may also locate, edit or add a customer via the customer lookup. For more information about the lookup functions see Customer Lookup.
Miscellaneous customers may not have recurring bills.
|
Format |
12 characters |
|
Example |
Type 100 |
Options
If you have left the customer number blank, the cursor will move to the name field to permit selection by customer name. Remember that lower-case letters are significant. Enter the customer name, or the leading characters of the name; or use one of the options:
|
<F2> |
For the next customer on file, in customer name sequence |
|
<SF2> |
For the previous customer |
|
Blank |
To revert to selecting the customer by his number |
You may also locate, edit or add a customer via the customer lookup. For more information about the lookup functions see Customer Lookup.
|
Format |
25 characters |
|
Example |
(Does not occur in this example because you have already selected the customer by number.) |
Enter a reference number to identify this recurring bill (an actual invoice number will not be assigned until the bill is selected and printed). Each of a customer’s recurring bills must have a different number, but the same number can be used for another customer.
|
Format |
6 characters. Lower-case is allowed but is converted to upper-case. |
|
Example |
Type 3371 |
Enter a code to assign this recurring bill to a group of bills. This field is optional.
Groups are also used for automatic selection of recurring bills, in which all recurring bills in a group (or range of groups) are selected for use. When a recurring bill is used as an invoice, its Group becomes the invoice’s Bill group.
|
Format |
3 characters. Lower-case is allowed but is converted to upper-case. |
|
Example |
Type AAA |
Enter the code for the ship-address at which services are performed or to which goods are delivered. This field is not required; if you leave it blank, the ship-to address is assumed to be the same as the bill-to address.
Options
You may use one of the options:
|
<F1> |
For the next ship-to address on file for this customer |
|
<SF1> |
For the previous ship-to address on file for this customer |
|
<F2> |
To enter a new ship-to address |
|
Format |
999 |
|
Example |
Press <Enter> |
[Ship-to Address]
This displays automatically unless you pressed <F2>, in which case you may enter an address. All lines of the address are optional.
|
Format |
2 lines of 25 characters each 2 more lines of 30 characters each 1 line of 3 characters for the country code |
|
Example |
(displays automatically in this example) |
Do you want to save this ship-to ?
This question appears only if you pressed <F2> at Ship to field and entered a non-blank address.
Answer Yes to save this address, just as though it had been entered in the Ship-to addresses (Enter) selection. The next available ship-to number for this customer is assigned automatically.
Answer No to use this address for this recurring bill only.
|
Format |
One letter, either Y or N |
|
Example |
(does not occur in this example) |
Enter the customer purchase order number. This field is optional.
|
Format |
15 characters |
|
Example |
Type 55815 |
For a balance forward customer, the customer’s default terms code displays and cannot be changed.
Options
For an open item customer, enter a terms code or use the option:
|
<F2> |
For the customer’s default terms code. |
|
Format |
3 characters |
|
Example |
Press <F2> |
|
Note |
The following fields are optional and depend on choices made in Control information. Using character mode, when a field is omitted the remaining fields are renumbered. For this reason your screen may not look the same as the one illustrated. |
| • | Ship via |
| • | Sales rep |
| • | Cost ctr |
| • | Job # |
| • | Sub-job # |
| • | 1st user-defined field. User defined fields are set up in the A/R Optional fields in Control information |
| • | 2nd user-defined field |
| • | 3rd user-defined field |
This field can be entered only if Control information specifies that ship-via’s are used.
Options
This field is optional, but if entered it must be a valid entry in Ship-via codes. Enter a ship-via code or use the option:
|
<F2> |
For the customer’s default ship-via code (if present) |
|
Format |
3 characters |
|
Example |
Press <F2> |
The tax code entered for this recurring bill must exist in A/R Codes. Enter a tax code, or use the option:
|
<F2> |
For the default tax code from Customers or, if applicable, from Ship-to addresses |
|
Format |
3 characters |
|
Example |
Press <F2> |
This field appears only if Control information specifies that sales representatives are used.
Options
Enter a sales representative code or use the option:
|
<F2> |
For the customer’s default sales representative |
|
Format |
3 characters |
|
Example |
Press <F2> |
This field appears if Control information specifies that multiple cost centers are used, or if cost centers are not used, but sub-accts are used.
Options
Enter the cost center or sub-acct to which this recurring bill is assigned, or use the option:
|
<F2> |
For the default cost center or sub-acct from Control information or the default cost center or sub-acct from Customers (depending on what your answer has been to the question Assign cost ctrs by in Control information) |
|
Format |
Your standard format for cost centers or sub-accts as defined in Company information |
|
Example |
Press <F2> |
For an existing entry [only], this field displays the next date that this recurring bill is due. This is informational only and may only be changed from the Recurrence Information Screen.
For an existing entry [only], this field displays if this entry is currently selected. Select for use is described later in this chapter.
This field appears only if you are interfaced to the PBS Job Cost module.
Job number is optional; leave it blank if this recurring bill is not for a job.
A recurring bill can be entered only for a single job, not for multiple jobs.
Enter the number of the job for this recurring bill. The job must be an active or closed job already on file in the active files of the Job Cost module. You may use one of the options:
Options
|
<F1> |
For the next job on file in the Job Cost module |
|
<SF1> |
For the previous job |
|
Format |
7 characters, or blank if this bill is not for a job. |
|
Example |
(This field does not appear since J/C is not interfaced.) |
This field appears only if you are interfaced to the PBS Job Cost module.
If this bill is not for a job, or if that job does not have sub-jobs, or if it has sub-jobs but does not bill for them, this field displays as Not applicable and may not be entered.
Options
Otherwise, enter the number of the sub-job, or use one of the options:
|
<F1> |
For the next sub-job for this job |
|
<SF1> |
For the previous sub-job |
|
Format |
999 |
|
Example |
(This field does not appear since J/C is not interfaced.) |
These user-defined optional fields appear only if defined in the A/R Optional fields from Control information. The particular captions shown are those you entered in the example in that chapter.
Enter the information appropriate to each field.
|
Format |
(Number of characters as specified in Control information) |
|
Example |
Press <Enter> at each field |
Graphical Mode
Make any changes. When finished select the Save button or Alt+s. You may also select the Line items button or Alt + l to save the new entry and starting entering the lines.
When this button is selected all quantities for the lines are changed to zero. It does not affect flat rate service lines with no unit of measure. Following this you must edit the lines and enter specific quantities.
Character Mode
Field Number To Change ?
Make any needed changes. For an existing entry:
You may not change the job or sub-job number.
Options
You may use the options:
|
<F1> |
For the next entry on file |
|
<SF1> |
For the previous entry |
|
<F3> |
To delete this entry |
When you press <Enter>:
| • | If this is a new entry, the line-item screen appears automatically. |
| • | If this is an existing entry, you are asked: |
Do you wish to change line items ?
Options
Answer Y if you wish to change or view either the line items or the totals screen. Answer N to terminate this transaction and process another recurring bill. You may use the option:
|
<F2> |
To view recurrence information |
|
Format |
One letter, either Y or N |
|
Example |
(Does not occur in this example because this is a new entry) |
Do you wish to zero line qtys ?
When changing lines is chosen, you are asked if you want to zero all quantities for the recurring bill. If you answer Y, the quantities for the item and service lines are zeroed. Selecting Y does not affect flat rate services that do not have a unit of measure. Except for non unit of measure items, when zeroing line quantitys the Qty: and Invoice total: fields on the Line item screen are also zerod. Also, if the recurring bill is Selected the status is changed to Not selected.
If you use the default of N, the line quantities, total quantiity, invoice total and selected status is not affected.
A screen appears to enter the first line item on this recurring bill:
Graphical Mode
Here is an example with some goods entered:
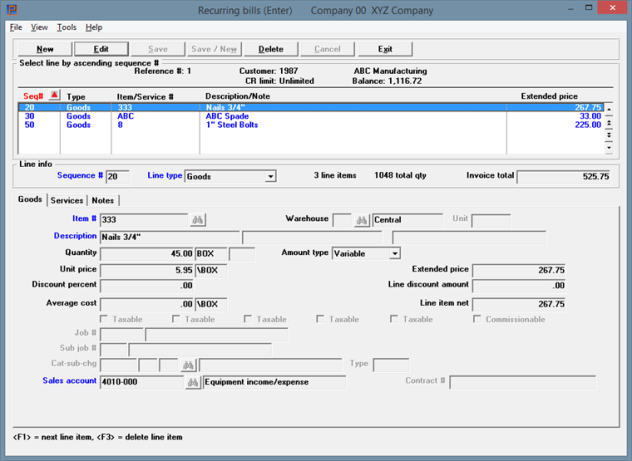
Up to 6 existing recurring bill lines display in the list box. You may sort the lines by sequence number in ascending or descending order. Click the arrow to the right of the column name to change the sort or use the View menu options. Only fields with red column labels may be sorted.
To locate a line, start typing the sequence number or type depending on which column is selected.
You may also use the up/down arrows, Page up, Page down, Home and End keys to locate a line. When adding a line or scanning through the recurring bill lines, the corresponding tab will display based on the Line type.
You have the following options with the buttons:
| Button | Keyboard | Description |
|---|---|---|
|
New |
alt+n |
For entering a new recurring bill line |
|
Edit |
alt+e |
For editing an existing recurring bill line |
|
Save |
alt+s |
For saving the addition of the new recurring bill line or for saving the changes to an existing recurring bill line |
|
Save/New |
alt+w |
This is a combination of the Save and New buttons |
|
Delete |
alt+d |
To delete an recurring bill line |
|
Cancel |
alt+c |
To cancel adding or editing an recurring bill line. Your entries will not be saved |
|
Exit |
alt+x |
To exit the recurring bill line window. The totals screen will display next |
Character Mode
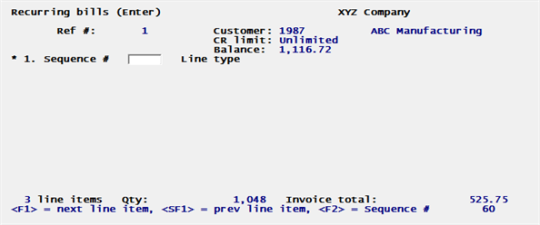
As you enter the lines the number of line items and total quantity are updated on the screen.
Enter the information as follows:
This field is skipped when entering in graphical mode. However you may edit it by clicking on the field or use <Shift+Tab> to move access it from the Line type field.
This field can only be entered or changed when adding a new line. Enter a sequence number, or in character mode use one of the options:
|
<F1> |
For the next existing line item |
|
<SF1> |
For the previous line item |
|
<F2> |
For the next available sequence number |
|
<Esc> |
To proceed to the totals screen |
|
Format |
9999 |
|
Example |
Press <F2> |
This field can only be entered or changed when adding a new line. The different line items differ so much in appearance that each is described in a separate section. Enter a line type from among:
| Character | Graphical | Description |
|
G |
Goods |
|
|
|
|
When interfaced to Inventory Control items read about it here: Goods Line Items (with I/C) |
|
|
|
When interfaced to goods from Goods and services read about it here: Goods Line Items (without I/C) |
|
S |
Services |
Read about it here: Services Line Items |
|
N |
Notes |
Read about it here: Notes Line Items |
|
B |
Standard bill |
Read about it here:Standard Bill Line Items |
|
Format |
Graphical: Character: One letter from the list above |
|
Example |
Type G |
When interfaced with items from Inventory Control the following screen appears:
Graphical Mode
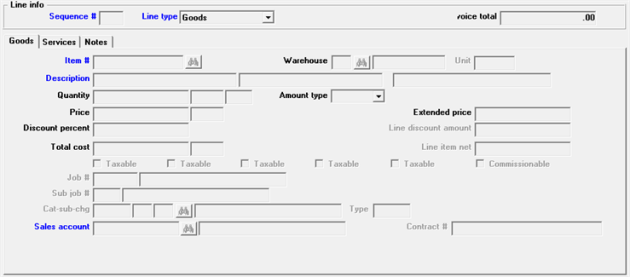
This is the Goods tab for entering I/C items:
Character Mode
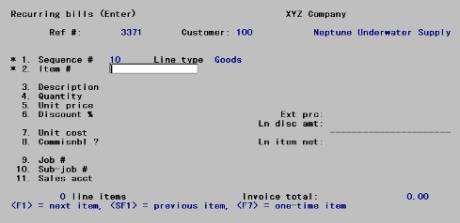
This screen closely resembles the corresponding screen in Invoices. Only the differences will be noted here.
Select the desired item from the look-up box with its corresponding item number.
You may use the lookup to view, select, add, modify or delete an item. For an explantion of the lookup functions see Item Lookup.
Select the desired warehouse from the look-up window.
If this service is on file, its description displays automatically. You can change this or press <Enter> to accept it as is.
If the service is not on file, enter the description of the service.
|
Format |
The service text length specified in Control information |
|
Example |
Press <Enter> |
In graphical mode a window displays where you may enter up to 10 lines of description. If more than 1 line of description has been entered, then the word (more) displays. If the word is black, you may click on it to view more lines of description, even when you are not in edit mode. When the word is grayed out then there is only 1 line of description for the service line.
In character mode, the following message displays:
Do you wish to enter any additional description ?
Answer Y to enter up to nine additional lines of description.
|
Format |
One letter, either Y or N. The default is N. |
|
Example |
Press <Enter> |
If you had answered Y, a window would have opened to allow the additional description. This description is not added to the file but appears on this document only. If there is more information than can be viewed on the first description line, then the word (more) displays to the right of the description line.
Options
If you have fewer than nine lines, use the option:
|
<F2> |
To terminate the description. Press this at the next line after the one you want to save. |
The window closes as soon as the additional description is entered, and only the first line remains visible.
|
Format |
Up to nine lines, each of the service text length specified in Control information |
|
Example |
(Does not occur in this example) |
This field appears as Quantity. In Invoices it appears as Quantity ordered or Qty ordered.
The quantity entered is the quantity to be invoiced each time the recurring bill is selected for use (not the total quantity for the expected life of the recurring bill).
You may not view alternate items (<F2>) or alternate warehouses (<F5>), nor may you view quantities (<F3>) for this item.
No check is made at this time that the quantity ordered is in stock.
A negative quantity may be entered.
Specify whether the quantity is usually the same for this recurring bill (a fixed quantity), or whether it varies each time the bill is selected to be used as an invoice (a variable quantity). For instance, rent is usually fixed but the phone bill is different each month.
Predefining this makes the subsequent selection process easier since it lets you search for only the line items that have to be changed.
Enter F in character or select Fixed in graphical. Enter V or Variable.
If the quantity entered is zero, this field is automatically set to V or Variable.
|
Format |
Graphical: Drop down list, either Fixed or Variable Character: One letter, either F or V |
|
Example |
Type V |
Sale and/or contract price, if applicable at the time of entry, is available via the option keys. The expiration date of the recurring bill is not checked against that of the sale or of the contract.
Changes to the price and cost in Items are not automatically reflected in the outstanding recurring bills, so you should review your recurring bills when you make price changes or upon the expiration of a sale or of a contract.
This field is skipped if Control information specifies that you do not use commissions.
Otherwise, check this box (yes) if a sales representative is entitled to commission on this line item, or leave it unchecked if not.
|
Format |
Check box. Checked is yes and unchecked is no. The default is no |
|
Example |
Select the <Enter> key for the default |
Default selection will appear. If change needed, select from the lookup box.
This field displays the number of the contract, if the item is set up in I/C as a contract price, for this customer.
Replacement cost
Average cost
Standard cost
Each time the recurring bill is used, the cost used is the current cost, not the cost at the time the recurring bill was originally entered.
This field does not appear. Returned goods on a recurring bill do not happen.
These fields are informational only. Recurring bills cannot be split across jobs.
These fields do not appear. Returned goods do not occur on a recurring bill.
Field number to change ?
<F5> (show warehouse information) is not available.
<SF5> (show job description) is not needed because job description displays without it.
When interfaced to goods from Goods and services the following screen appears:
Graphical Mode
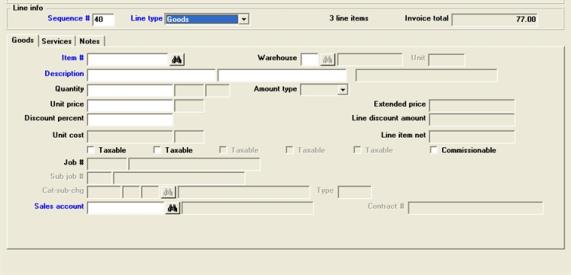
This is the goods tab for entering a good from A/R Goods and services:
Character Mode
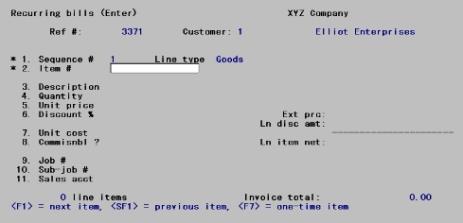
This screen closely resembles the corresponding screen in Invoice. Only the differences will be noted here.
Enter the quantity to be invoiced each time the recurring bill is selected for use (not the total quantity for the expected life of the recurring bill.
Specify whether the quantity is usually the same for this recurring bill (a fixed quantity), or whether it varies each time the bill is selected to be used as an invoice (a variable quantity). For instance, rent is usually fixed but the phone bill is different each month.
Predefining this makes the subsequent selection process easier since it lets you search for only the line items that have to be changed.
Select Fixed (enter F) or select Variable (enter V).
If the quantity entered is zero, this field is automatically set to Variable.
|
Format |
One letter, either F or V |
|
Example |
Type V |
Changes to the price and cost in Goods and Services are not automatically reflected in the outstanding recurring bills, so you should review your recurring bills when you make changes.
These fields are informational only. Recurring bills cannot be split across jobs.
Field number to change ?
<SF5> (show job description) is not needed because job description displays without it.
The following screen appears:
Graphical Mode
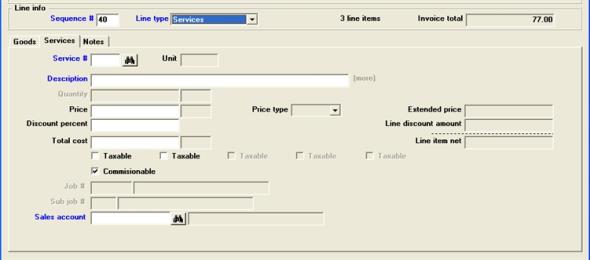
Character Mode
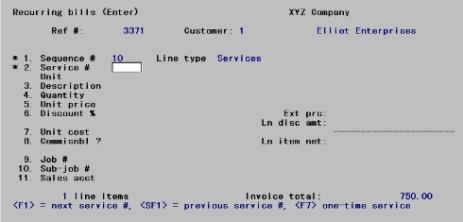
This screen closely resembles the corresponding screen in Invoice. Only the differences will be noted here.
The quantity entered is the quantity to be invoiced each time the recurring bill is selected for use (not the total quantity for the expected life of the recurring bill).
Quantity is not accessible for a service with no unit of measure. It is assumed to be a quantity of one.
This field is accessible after entering the Quantity if a unit has been specified, but if no unit applies the same question is asked after entering the Price.
Specify whether the extended price of the line item is fixed, or whether it varies each time the bill is selected for use.
Select Fixed (enter F) or select Variable (enter V).
If a unit has been specified but the quantity entered for that unit is zero, this field is automatically set to variable.
|
Format |
One letter, either F or V |
|
Example |
Type V |
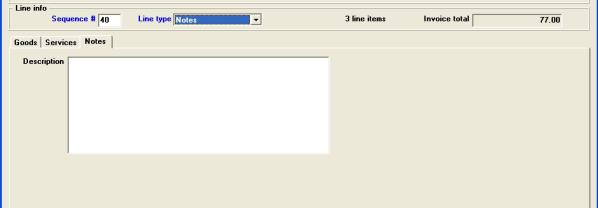
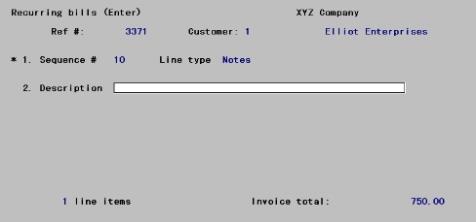
The following screen appears:
Graphical Mode
Character Mode
 9
9
This screen is entered identically to the corresponding screen in Invoices. See the Notes Line Items section in the Invoices chapter.
The following screen appears:
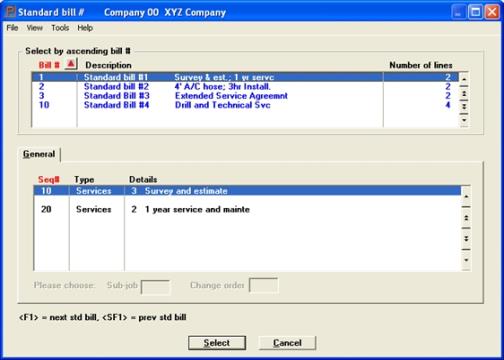
Graphical Mode
Character Mode
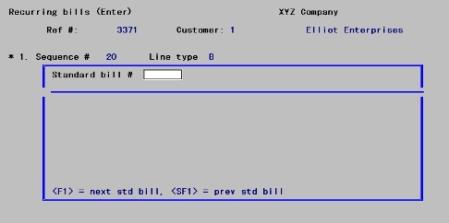
This screen closely resembles the corresponding screen in Invoices. see the Standard Bill Line Items section in the Invoices chapter. Only the differences will be noted here.
Fixed and Variable Items
Each Services line item from the standard bill is copied as a variable line item if either its quantity or its price is zero. Otherwise it is copied as a fixed line item.
Each Goods line item is copied as a variable line item if its price is zero (their quantity is always non-zero). Otherwise it is copied as a fixed line item.
If desired you can change these from Field number to change ? after the standard bill has been copied.
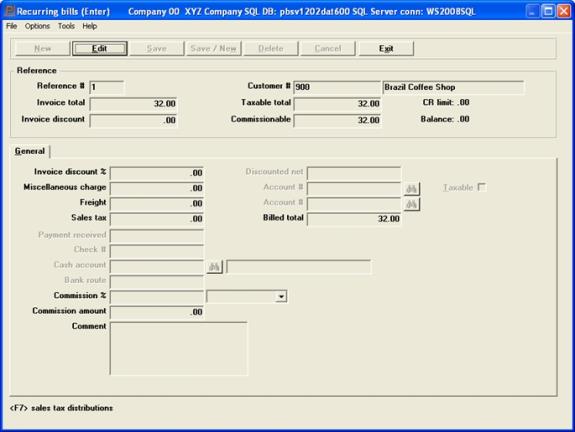
The totals screen appears.
Graphical Mode
Character Mode
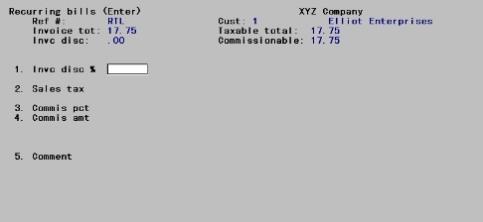
This screen closely resembles the corresponding screen in Invoices.
Invoice discount %
This field cannot be entered if Control information specifies that you do not use overall invoice discounts.
Options
Otherwise, enter the invoice discount percent or use the option:
|
<F2> |
For the customer’s default. This option is available only if there is a non-zero value for this in Customers. |
Upon entry, the discount amount is calculated and displayed at the top of the screen, as is the discounted net amount (invoice total less discount.
The invoice discount percent is not applied to the miscellaneous or freight charge, nor to the sales tax regardless of what you may have answered to the Discounts calculated on Miscellaneous charges, Freight and Sales tax check boxes in Control information. Those questions relate to any customer discount which the customer may be entitled to upon payment, provided that he pays on time.
|
Format |
99.999 |
|
Example |
Type 5 |
This field does cannot be entered if the Use misc charges check box from Control information specifies that you do not use miscellaneous charges.
Otherwise, enter any miscellaneous charges for this invoice.
If this is a credit memo and miscellaneous charges are being credited, do not enter a minus sign. Enter the miscellaneous charges as a positive amount.
|
Format |
99,999,999.99- |
|
Example |
Type 20 |
This field is skipped if the Use freight charges field from Control information specifies that you do not use freight charges.
Enter the amount of any freight charges. On credit memos, enter freight charges without any minus sign.
|
Format |
9,999,999.99- |
|
Example |
Type 60 |
The sales tax, if any, may be calculated by applying the sales tax percent of applicable tax rates to the Taxable total displayed at the top of the screen.
Sales tax may also be calculated by invoice line unit price or extended price. Calculating the sales tax by line is determined by the setup of Tax codes. For an example of this type of taxation see the Sample Tax Calculations section from the Tax Codes chapter.
Miscellaneous charges and freight are added to the taxable total if specified to be taxable in Control information. The sales tax percent comes from the tax code that was entered on the header screen for this invoice.
After entry of the sales tax, the following amounts are added:
| • | Invoice total (or Discounted net, if an invoice discount is used) |
| • | Miscellaneous charges (if used) |
| • | Freight (if used) |
| • | Sales tax (if any) |
The total is displayed as Billed total.
Options
Enter a sales tax, or use the option:
|
<F2> |
For the calculated amount |
If you enter a non-zero sales tax when the tax code specified for this invoice has a zero tax rate, you will be warned but the entry will be accepted.
|
Format |
99,999,999.99- The default is the calculated amount. |
|
Example |
Press <F2> |
Some differences will be noted here:
Misc charges and
Freight and
Sales tax
Negative entries are not allowed (because quantity may not be negative).
Payment recd
Check #
Cash account and
Bank Route
These fields may not be edited. They can be edited each time the bill is selected for use.
Field number to change ?
The <F6> option for notes is not available. Recurring bills do not have notes. Notes can be added as desired each time the bill is selected for use.
Pressing <Enter> does not terminate the entry but brings up the recurrence information screen.
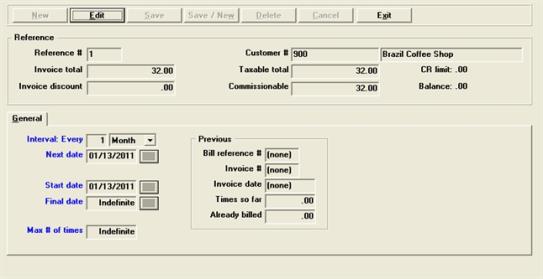
This screen lets you define how often you want the recurring bill to be used as an invoice. You can also limit the life cycle of the recurring bill; either by the number of times it is used or by starting and final dates (or by both methods). It also displays previous usage information.
The following screen appears:
Graphical Mode
Character Mode
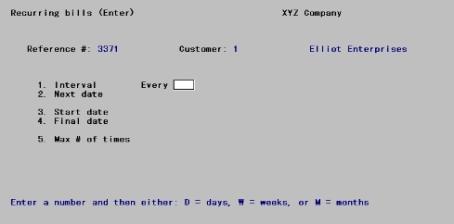
Enter the information as follows:
Specify how frequently the recurring bill is charged to the customer. Enter a number, then enter the one of the following time period codes:
| Character | Graphical |
|
D |
Day |
|
W |
Week |
|
M |
Month |
The first number specifies the quantity of that time period. For instance, 3 Week is billed every 3 weeks.
You may not leave this field blank, but this does not mean that you cannot use recurring bills for services or goods invoiced at irregular intervals (e.g., snowplowing, repairs). Simply specify an interval long enough that the bill will never be selected by date, and a group code distinctive enough that you can select only your irregular bills when you want to.
|
Format |
99 for the first subfield one letter for the second subfield |
|
Example |
Type 1, then Type M, to specify that the bill occurs every one month |
Enter the next date the recurring bill is due.
Provided that other selection criteria (such as group code) are met, automatic selection will select this entry whenever the specified next date falls due — unless that is earlier than the specified start date or later than the specified final date. It will also calculate a new next date to be ready for the next cycle.
The next date is automatically advanced by the time interval specified each time an invoice is created from this recurring bill (by running Use selected). Thus if your billing cycle is a few days late or early, this does not upset the schedule for the next cycle.
When calculating the next date by day or by week, the interval specified is projected forwards without regard to day of month. When calculating the next date by month, this month’s calendar date is projected forwards into the next month, except for necessary adjustments due to variations in the length of months.
If you are billing on schedule, the calculated next date will normally be a future date. However, if you skip a billing cycle the system may calculate a next date which is actually in the past. It does not add the interval twice so as to force the next date into the future. This means that if you skip one cycle and compensate by billing double on the next, the recurring bill will be out of sync by one cycle until you adjust it manually.
|
Format |
MMDDYY The default is the date of the last recurring bill entered this session, if any; otherwise it is the system date. |
|
Example |
Type 041505 |
Options
Enter the date on which you want to start charging this bill to the customer, or use the option:
|
<F2> |
For the system date |
|
Format |
MMDDYY |
|
Example |
Type 31505 |
Enter the date after which you want to stop charging this bill to the customer, or use the option:
|
<F2> |
For Indefinite |
After this date, this entry will not automatically be selected for use when you select by date; however, it still remains on file until you explicitly delete it.
|
Format |
MMDDYY |
|
Example |
Press <F2> |
Options
Enter the number of times you want to charge this bill to the customer, or use the option:
|
<F2> |
For Indefinite |
|
Format |
999 |
|
Example |
Press <F2> |
Previous Usage Fields
These are display-only fields which provide previous usage information for this recurring bill. They include:
Bill reference #
This is the bill reference number for the last time this bill was selected and used.
Invoice #
This is the invoice number for the last time this bill was selected and used.
Invoice date
This is the invoice date for the last time this bill was selected and used.
Times so far
This is the total number of times used so far for this recurring bill. It is an accumulated amount of all the times it was selected and used.
Already billed
This is the total amount billed so far for this recurring bill. It is an accumulated dollar amount of the previous times it was selected and used.
Make any needed changes, select Save to then press <Enter>. This completes the entry of the recurring bill.
Select
Edit List from the Recurring bills menu.
See a sample Recurring Bills List in the Sample Reports appendix.
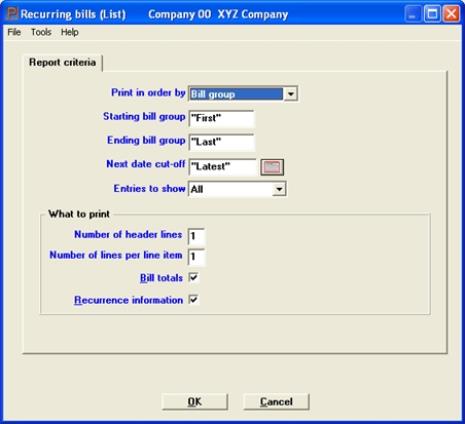
The following screen appears:
Graphical Mode
Character Mode
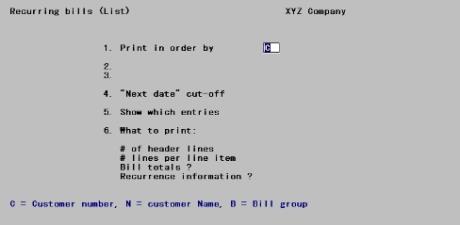
Enter the information as follows:
Options
Enter the order in which you want the recurring bills shown. This order can be listed by customer number order, customer name order or Bill group order.
| Character | Graphical |
|
B |
Bill group |
|
C |
Customer number |
|
N |
Customer Name |
|
Format |
Graphical: Drop down list. See list above Character: One letter |
|
Example |
Type C |
The next two fields depend on the choice of printing order.
Options
Enter the range of numbers or names to list, where choice represents whatever you entered Field #1. At each field you may use one of the options:
|
<F1> |
(customer name only) To toggle between entering a personal name and a company name. |
|
<F2> |
For the First starting choice or Last ending choice |
|
Format |
12 characters for customer number 25 characters for company name 14 characters for personal name (surname) 10 characters for personal name (1st name) 3 characters for group code |
|
Example |
Press <F2> at each field. |
Options
Enter the date up to which you want to show recurring bills. Recurring bills whose next date field is later than this will not be shown. You may use the option:
|
<F2> |
For the Latest date (show recurring bills regardless of when they are next due) |
|
Format |
MMDDYY The default is the current date. |
|
Example |
Press <F2> |
Options
You have three choices for this field, as follows:
|
Character |
Graphical |
Explanation |
|
A |
All |
All recurring bills for the range and cut-off date above are shown on the list. |
|
E |
Expired only |
Expired entries are those which have already been selected more than the maximum number of times or have a next date later than the final date. Running this report occasionally lets you identify entries that ought to be deleted. |
|
S |
Selected only |
Only selected entries are shown. Selection is explained in the next section. Running this report after Select for use lets you review your manual selections. |
|
Format |
Graphical: Drop down list, select from above Character: One letter from the list above |
|
Example |
Press <Enter> |
What to print
Select the amount of information to show for each recurring bill.
Options
Enter the number of header lines to show for each recurring bill, or use the option:
|
<F5> |
For All information for the header |
|
Format |
One digit, either 1 or 2. The default is 1. |
|
Example |
Press <F5> |
Options
Enter the number of header lines to show for each line item, or use the option:
|
<F5> |
For All information |
Enter 0 to not print any line items.
|
Format |
One digit, either 0, 1, 2, or 3. The default is 1. |
|
Example |
Press <F5> |
Check the box or enter Y to show the totals information for each recurring bill, or uncheck it or enter N to not do so.
|
Format |
Graphical: Check box where checked is yes and unchecked is no. The default is checked. Character: One letter, either Y or N. The default is Y. |
|
Example |
Press <Enter> |
Check the box or enter Y to show recurrence information for each bill, or unchecked it or enter N to omit it.
|
Format |
Graphical: Check box where checked is yes and unchecked is no. The default is checked. Character: One letter, either Y or N. The default is Y |
|
Example |
Press <Enter> |
Click on OK to print or Cancel to not print.
In character mode, from Field number to change ? make any needed changes, then press <Enter> to print the report.
This selection enables you to select which recurring bills are to be used as invoices in the current billing cycle.
In order to use a recurring bill as an invoice, first select the bill for use. Then run Use selected to actually use the selected bill as an invoice.
Select
Select for use from the Recurring bills menu.
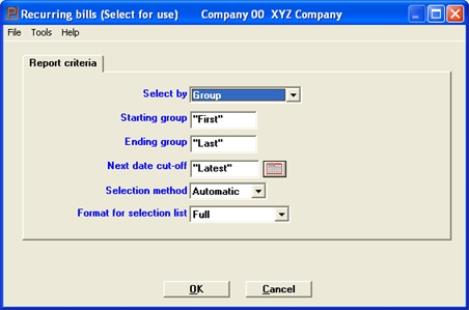
The following screen appears:
Graphical Mode
Character Mode
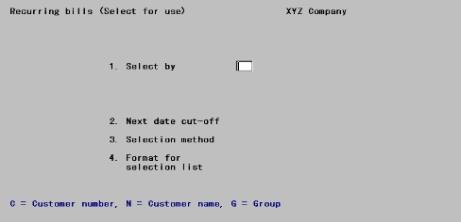
Enter the following information.
Options
Specify what field you wish to control the selection process. This defines what range will be used for selection. For manual selection (described later), it also determines the order in which the recurring bills will be presented to you. For automatic selection, it determines the order in which the report will be printed.
| Character | Graphical |
|
B |
Bill group |
|
C |
Customer number |
|
N |
Customer Name |
|
Format |
Graphical: Drop down list. See list above Character: One letter |
|
Example |
Type C |
Starting (range) and Ending (range)
Options
Enter the range of numbers or names to list, where choice represents whatever you entered Field #1. At each field you may use one of the options:
|
<F1> |
(customer name only) To toggle between entering a personal name and a company name. |
|
<F2> |
For the First starting choice or Last ending choice |
|
Format |
12 characters for customer number 25 characters for company name 14 characters for personal name (surname) 10 characters for personal name (1st name) 3 characters for group code |
|
Example |
Press <F2> at each field. |
Options
Enter the date up to which you want to select recurring bills. Recurring bills whose next date field is later than this will not be selected. You may use the option:
|
<F2> |
For the Latest date (select recurring bills regardless of when they are next due) |
|
Format |
MMDDYY The default is the current date. |
|
Example |
Press <F2> |
Select the A (Automatic) or M (Manual) method of selecting recurring bills.
| • | Automatic selection is faster and produces a report for your review. It selects all recurring bills that meet the range you have defined. |
No distinction is drawn between fixed and variable line items.
Automatically selecting one range of recurring bills does not unselect any bills that may have been selected already. Bills selected either manually or automatically remain selected until used, unless individually unselected.
| • | Manual selection displays to you the recurring bills in the range selected, one by one. |
You can select (and unselect) them individually.
You can change any field in the header, line items, or totals screens of any bill. Such changes apply not only to the invoice which will be created from this recurring bill, but to the recurring bill entry itself. They remain on file for the next time the recurring bill is used.
You can specify the payment received if applicable. This applies only to the invoice which will be created from this recurring bill, not to the recurring bill entry itself. No cash receipt will post; this is for reference only.
You can take advantage of the fixed/variable distinction to examine only the variable line items.
You can select recurring bills outside the range selected, provided you know the customer and bill number.
| • | You can run automatic selection first to select the bulk of the bills, then examine the resulting report, and finally handle any exceptions via manual selection. |
|
Format |
Graphical: Drop down list, either Automatic or Manual. The default is Automatic Character: One letter, either A or M. There is no default |
|
Example |
Type A |
If you have chosen manual selection, this field displays as Not applicable and may not be entered.
Otherwise, this field controls the format of the Recurring Bills Automatic Selection Edit List. Enter B for brief format or F for full format.
|
Format |
Graphical: Drop down list, either Full or Brief. The default is Full Character: One letter, either B or F. There is no default |
|
Example |
Type F |
Click on OK to proceed or Cancel to not make any selections. In character, make any needed changes from Field number to change ?, then press <Enter> to continue.
| • | If you chose automatic selection, there will be a period of processing as the Recurring Bills Automatic Selection Edit List is printed. Once the report is printed this terminates the selection; no further screens appear. |
| • | If you chose manual selection, the header screen appears automatically and you can examine the recurring bills individually. All the screens described in the Enter section of this chapter are available, except the recurrence information screen. Those descriptions will not be repeated here, except to point out the differences. |
Header screen
Options
The options available from the Customer field are:
|
<F1> |
For the next recurring bill within the range of customers, groups, and/or dates specified on the first screen. |
|
<SF1> |
For the previous recurring bill |
You can also select bills by entering an explicit customer number and bill number, whether or not the bill is within the range specified on the first screen.
Once a bill has been specified (by either method):
| • | If the bill has not already been selected, you are asked Select this bill ?. |
If you answer N the bill remains unselected and the screen clears for selection of another bill.
If you answer Y the bill is selected and you are positioned at Field number to change ?.
| • | If the bill is already selected, you are told This recurring bill has already been selected and asked Do you want to unselect it ?. |
If you answer Y the bill is unselected and the screen clears for selection of another bill.
If you answer N the bill remains selected and you are positioned at Field number to change ?.
| • | If you select a bill that has already expired or has been used more than its maximum number of times, you are so informed. You must confirm that you really wish to do this before continuing. |
| • | If the customer is already over his credit limit, a message appears informing you of this and you are asked whether you want to continue selecting this bill. Answer N to exit from selecting this bill or Y to continue. Note that a bill big enough to tip the customer over his credit limit does not trigger a warning if he is not over the limit already. |
Press <Enter> to bring up the line-item screen.
Line-item screen
Options
Your options here are:
|
<F1> |
For the next existing line item |
|
<SF1> |
For the previous line item |
|
<F2> |
For the next existing variable line item |
You can add a new line item by entering a sequence number for it; however you are not prompted for the next available sequence number.
From Field number to change ? you can delete the line item with <F3>, or change any field.
For variable line items, you should enter the quantity and price.
If you make a change to the quantity or total price, you must re-enter the Fixed or variable field. This will become the default for future uses of this recurring bill.
When no more changes to line items are desired, press <Esc> at the Sequence # field. The totals screen appears.
Totals screen
Make any changes to the totals. Note that the Payment recd field and its associated fields have appeared. These may be entered in the same way as in Invoices (Enter) if payment has been received for this use of the recurring bill.
A sample Recurring Bills Automatic Selection List is in the Sample Reports appendix.
Before you use this option, you should always print a list showing only the recurring bills that have been selected. Use List and choose only selected bills.
When you have verified that your selection of recurring bills is correct and complete, you are ready to use them as invoices. The recurring bills still remain on file. The new invoices are unposted and must be printed and posted in the same manner as any other invoices. If you are using multi-payments, the program auto-assigns the customers terms. If you want to use some other payment method, then you must edit the payment after the invoice is selected.
Use selected operates upon all selected recurring bills. Once they have been used, they are no longer selected and are available to be selected again for the next cycle.
Select
Use selected from the Recurring bills menu.
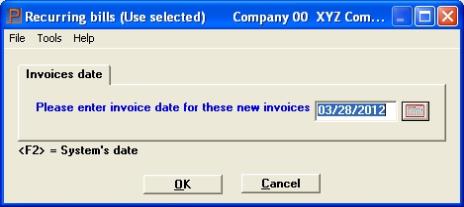
The following screen appears.
Graphical Mode
Character Mode
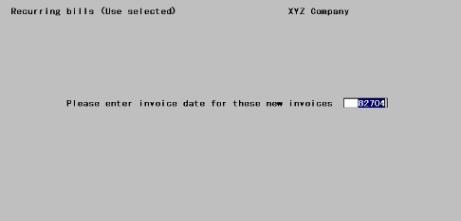
Enter the following information:
Please enter invoice date for these new invoices
Enter a date to be used as the invoice date. You do not have the option of postponing assignment of an invoice date until the invoice is printed (as you do with regular invoices).
Press <Esc> if you decide not to proceed with using recurring bills as invoices.
|
Format |
MMDDYY The default is the system date. |
|
Example |
Type 031599 |
In graphical mode select:
Click on OK to continue to select the bills or Cancel to not do any selecting.
Using character mode the question "Any change ?" displays. Enter Y to re-enter the screen, or N to proceed.
For both modes there will be a period of processing as an invoice is created from each selected recurring bill.
The newly-created invoice entries are assigned the next available bill reference numbers, and their Group number becomes the Bill group number.
If errors are detected, a Recurring Bills Exception Report is printed. The only error that is likely to occur is an insufficient quantity available to fill the full amount of the order. This can only happen if you are interfaced to the Inventory Control module. When this occurs, the quantity to ship field is set equal to the quantity ordered; but this may prevent the invoice from posting. If you wish to ship only the quantity in stock, or to cancel that line item, use Invoices (Enter) for the purpose before you print or post the invoices.
You can also use Invoices (Enter) if you wish to make further corrections or to add notes.